Monday, December 22, 2014

Install django in virtual environment


# Pre req:

I am using ubuntu 10.10 for this tutorial. Setup environment for python

# Install Django:
   Run below commands to setup django and create my first app

  pip install django

# Create test project 

  django-admin.py startproject testsite

It will create the testsite as project. Each project consist of many sub projects call apps. Lets create a app and call it soapapp, Which will take input soap requests. and will response json. I will write a blog on it latter on.

python manage.py startapp soapapp

Use terminal and write these command
>> ls
  
you will see component if django app like views, models, tests with (py) extensions, ofcourse it is python project

Views.py

So in views. py we will create a view. A simple code that will response ok is attached

import json
from django.http import HttpResponse

def hello(request):
    response_data = {}
    response_data['result'] = '200'
    response_data['message'] = 'ok'
    return HttpResponse(json.dumps(response_data), content_type="application/json")
URLs.py

Lets create urls class, where we will register url for above create view.

from django.conf.urls import patterns, url
from views import *

urlpatterns = patterns('soapapp.views',
   url(r'^hello$', 'hello', name='hello'),
)

Register this url file in main app urls.py
 
so from command line open

/venv_hello/testsite/testsite$ sudo gedit urls.py &
And append this line in url

url(r'^soap/', include('soapapp.urls')),

Run app:

To run this app open email folder, root of the app, as we have testsite. There type command
sudo python manage.py runserver
you can see reponse http://127.0.0.1:8000/soap/hello


You can download sample project from this link.

References 

# http://stackoverflow.com/questions/2428092/creating-a-json-response-using-django-and-python


Setup environment for python

Pre req:

I am using ubuntu 10.10 for this tutorial.

1) Install python

Using below command you can install python, I will install components like pip, virtualenv along with python.

Open terminal and past below code:

sudo apt-get install python-pip python-dev build-essential

# Check version of python
python --version

# Upgrade tools:
sudo pip install --upgrade pip
sudo pip install --upgrade virtualenv 

2) Create a virtual environment and setup project

#Create a folder 

mkdir pywork
cd pywork
mkdir hellopy
cd  hellopy

# Create virtual environment for this project. 
virtualenv venv_hello (you can use any name)
cd venv_hello 

3) Create and execute a file (py)

  Create a file lest say t.py. You can add code like
   def test():
     print("Hello python")
    test();
to execute file use command  in terminal

           python t.py

References:

# http://www.saltycrane.com/blog/2010/02/how-install-pip-ubuntu/
# http://docs.python-guide.org/en/latest/dev/virtualenvs/
# http://stackoverflow.com/questions/1522564/how-do-i-run-a-python-program
# http://docs.python-guide.org/en/latest/dev/virtualenvs/

Monday, December 15, 2014

Setup environment for extension for my SmartWatch 2

In this blog I will demonstrate how to set up environment for development of apps for SW2.
I purchase SW2 because of its benefits written below

 # Now I can set my mobile on silence mod in office. When any call comes SW2 notify me.

# I have 5 inc mobile. Now I dont need to pick up every time I gets any notification. I just use my watch to see if the notification is important for me i.e I wana reply only then I pick phone. It saves time for me ... as I am a busy guy :)

# I can take selfy by adjusting my mobile on some place and with the help of  SW2 I can capture picture.

# There are holes in software of this device, there are great opportunities to build software for it

So let us make this watch more useful


Pre req:

Before start you must have installed android SDKeclipseADT.
Set up you SW 2 (Smart watch 2).

Step 1 Install Sony SDK:

# Open Android sdk manager, Select tools ->  Ad on sites. And select user defined sites.


# Click new button and insert => http://dl.developer.sony.com/wearables/sdks/Sony_Add-on_SDK/Sony-Add-on-SDK.xml in text box. click OK and close.


You can see a package name Sony Add-on SDK under Android 4.2.2 (API 19) and a package  Sony Add-on SDK in packages -> extras. Install this package.


#    Now after installation open File -> Import ->  Existing Android Code Into Workspace -> your android SDK/add-ons\addon-sony_add-on_sdk_3_0-sony-19\samples\SmartExtensions

Import projects in this folder. If you find any dependency issue. Right click each project and go to Properties -> Android -> Android target project and make it 4.4.2. After doing this to all clean and build workspace.


Step 2 Run a project on smartwatch 2:

# Now run a sample project. Lets say HelloActiveLowPowerPreferenceActivity. If your SW2 is connected with phone you can see below app, On Clicking text counters increment .


Reference:

# https://developer.sony.com/develop/wearables/smartwatch-2-apis/get-started/


Tuesday, September 9, 2014

How to create a crone job linux

Hi all,


As you do great stuff  with shall script lile backups , processing etc. Most of you are familiar with cron  jobs in linux. But for all those how dont know I am writing this tutorial.

In linux we have a usefull tool name crontab. We can add our cron jobs in crontab .

- To see running jobs in background use
sudo crontab -l
- To add a job
sudo crontab -e

Lets create a script that while same sate of a server in a text file. Let say we have a tomcat server ruining on linux system. And we want to nominator its state in hourly basis

A) Create s script:

1) Create minitor_tomcat.sh  at some location lets say home/<user folder>/
2) Add permission : sudo chmod +x  minitor_tomcat.sh 
3) Open file in gedit
4) Add code
status="$(sudo /etc/init.d/tomcat7 status)"
cdate="$(date)"
echo "$cdate : Tomcat status $status" >> /home/<user folder>/logs.txt;
B) Create a job:

1) call  
2) move cursor to the end of file
3) Follow the below format for creating a job

[MIN] [HR] [DOM] [MON] [DOW] [COMMAND] 

MIN : It is the Minute Field which can take values from 0 to 59.

HR : It is the HOUR Field which can take values from 0 to 23.

DOM : It is the Day of Month Field which can take values from 1 to 31.

MON : It is the Month Field which can take values from 1 to 12.

DOW : It is the Day of Week Field which can take values from 0 to 7, where 0 and 7 are Sundays.

So to run file hourly
* */1 * * * bash /home/<user folder>/minitor_tomcat.sh

After writing save  file, You can see your cron by using command sudo crontab -l

For more details about timing follow this.


You can run any command. I mean not only bash file but any command using crontab

For example if I wana write some text in a file monday I can write

* * * * 1 echo "hello job" >> /home/<user folder>/file.txt


Friday, February 7, 2014

Install softwares Ubuntu 12.04 for java & android developer

A) Setup java
sudo add-apt-repository ppa:webupd8team/java sudo apt-get update sudo apt-get install oracle-java7-installer And type this to check the version: java -version
i) Add path 
sudo gedit /etc/bash.bashrc

Append

export JAVA_HOME=/usr/lib/jvm/java-7-oracle export PATH=$JAVA_HOME:$PATH export JRE_HOME=/usr/lib/jvm/java-7-oracle/jre export PATH=$JRE_HOME:$PATH
source /etc/bash.bashrc B) Setup android home
Open terminal and cd /.../path/android-sdk 
use pwd to get path
sudo gedit /etc/bash.bashrc
Append 
export ANDROID_HOME=/../path/android-sdk-linux export PATH=$ANDROID_HOME:$PATH source /etc/bash.bashrc 
Follow this for setting up devices for development C) Setup Git
sudo apt-get install git-core
To create SSH key, follow this D) Setup eclipse
Download eclipse from here Follow this tutorial E) Setup maven
sudo apt-get install maven 
sudo gedit /etc/bash.bashrc export M2_HOME=/usr/share/maven export M2=$M2_HOME/binexport PATH=$M2:$PATH source /etc/bash.bashrc F) Setup install lamp for apache & mysql
sudo apt-get install tasksel
Then use tasksel to install the lamp-server collection of packages:
sudo tasksel install lamp-server This is far easier than mucking about with packages yourself.

Wednesday, June 12, 2013

ORM in android

Pre-req: Eclipse, android, Android Clients,

Hi guys,

Dealing with database in android takes alot of time.

  • First create schema i.e database and tables
  • Create database and tables with Database helper
  • Populate database i.e tables from android components i.e activities, services
  • Create queries, query manger classes and populate query results into Object

 Any mistakes in above step case crashes. We can speed up this process with some ORM, In this tutorial we will create a database with OrmLite and will see how many steps in sqlite database management we can skip. This is a basic level tutorial.


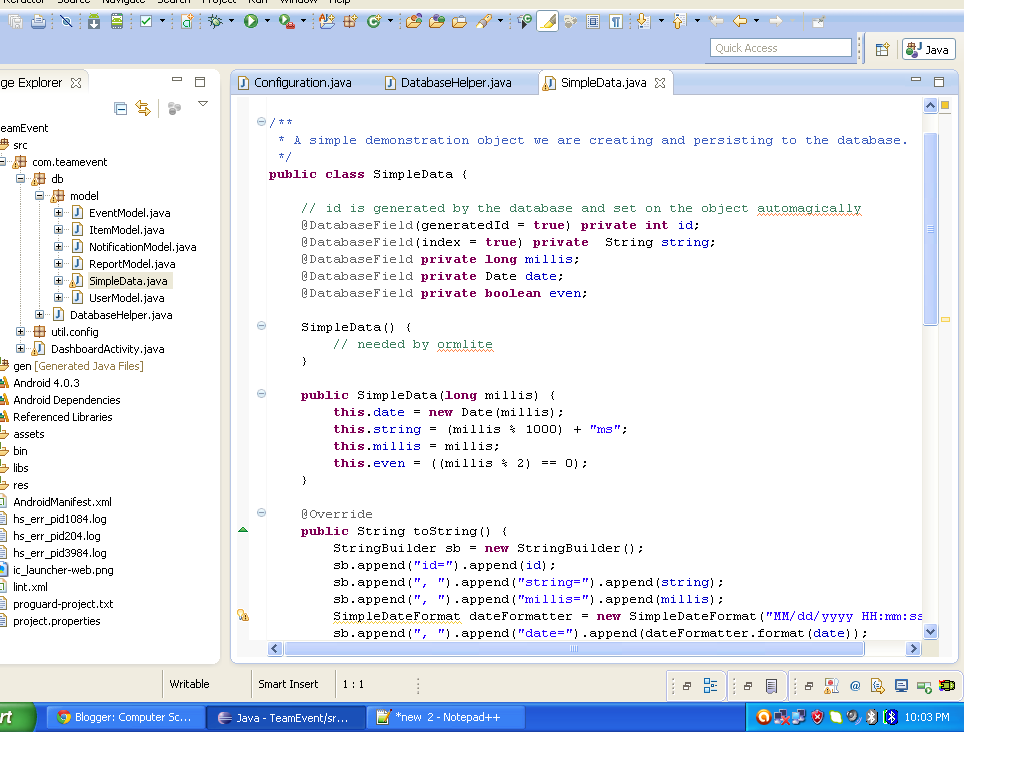
1) Create POJO/Class(s) these classes are tables


@DatabaseField(generatedId = true) //this annotation shows auto generated id column 
@DatabaseField(index = true) // column with index on it 
@DatabaseField(canBeNull = false, foreign = true) // a foreign key column, with not null constraint
@ForeignCollectionField(eager = false) //one to many relation
2)Create a Database Helper
  We always create database helper to create/update database, you just need to 
copy past database helper which is extension of OrmLiteSqliteOpenHelper.
 
Only with this command we can create a table.
TableUtils.createTable(connectionSource, SimpleData.class);
3) Create DAOs inside database helper:
public Dao<SimpleData, Integer> getSimpleDataDao() throws SQLException {
          if (simpleDao == null) {
                    simpleDao = getDao(SimpleData.class);
          }
         return simpleDao;
}
This DAO object help you to create rows, process query.

4) How to use in activity:
private DatabaseHelper getHelper() {
      if (databaseHelper == null) {
                databaseHelper = OpenHelperManager.getHelper(this, DatabaseHelper.class);
      }
      return databaseHelper;
 }
Queries data: 
Dao<SimpleData, Integer> simpleDao = getHelper().getSimpleDataDao();
long millis = System.currentTimeMillis(); 
// create some entries in the onCreate
SimpleData simple = new SimpleData(millis); 
simpleDao.create(simple);// Create row
         simpleDao.delete(simple);// delete row

         simpleDao.update(simple);//update row
List<SimpleData> list = simpleDao.queryForAll(); //query all object
         Query:
QueryBuilder<SimpleData, Integer> queryBuilder = simpleDao.queryBuilder();// get the 
//WHERE object to build our query
Where<SimpleData, Integer> where = queryBuilder.where(); 
// the name field must be equal to "foo"
where.eq("string", "foo"); // and operation
where.and();
// the password field must be equal to "_secret"
where.eq("id", "1"); 
PreparedQuery<SimpleData> preparedQuery = queryBuilder.prepare(); 
SimpleData simpleData = (SimpleData) simpleDao.query(preparedQuery);

Conclusion: 
  • We do not need to create sql schema for tables and database, table records management classes/providers.
  • We just need 2 thing , models (POJO) and extension of OrmLiteSqliteOpenHelper for conversion of models (POJO) into tables.
  • We access database from any android component i.e. activities , fragments, services.
  • No need to map results rows to object separately. For insertion and updation just save whole objects.
  • You can use same objects to map json data, if require.
  • It is simple to configure and use

Reference

Source code


Wednesday, May 22, 2013

Setup eclipse & android project for aspect oriented programming(AOP)

Pre-req: you should familiar with eclipse, know android programming and have knowledge of AOP.

Hi guys,

           Software development with Aspect oriented programming(AOP) is very popular these days. Because it is easy use and apply. And we can achieve good level of modularity and re-usability in our software architectures.
So I decide to deliver a presentation in my office. While preparing presentation I am writing this blog. The idea of my presentation is to introduce AOP and explain it with a demonstration (Sample), My sample will show how we can use AOP in android development. I will surly write blogs on android development with AOP but step by step.

AOP is also useful in enhancing legacy systems. By that I mean if you dont want to change existing code of system then create new modules in AOP. It will help you to keep separate no code with old one.

So lets start with step up eclipse and create a hello world android project with AOP.

Install AOP tool for eclipse:

1) Open eclipse and go to eclipse market place. Type AJDT (AspectJ Development Tools) in search bar. Choose respective plugin for eclipse. I am going to use Aspectj for compilation.


2) For example for my juno eclipse it is


3) Download and install then restart eclipse

Create android project:

Assuming you guys know how to create android project.

Fix android project for aspects

1) Right click android project and go to Configure and then Convert to AspectJ project. By doing that compile time errors will be remove and you can start creating aspects.


2)  Know create a prospect , I am creating aspect to print some words on start and end of onCreate() function in activity


3) Right click and run android project , you can see the printing in logs below


Sunday, April 28, 2013

Native Android Client Architecture And Frameworks

Hi guys,

We all know principle of kiss. We should keep our software architectures simple as possible. One way to do that is decide architecture and narrow down the problem before going for solution/decisions. Choose good frameworks/plugins, this will make your code simple and readable. And of-course this strategy encourages re-usability, which is a way of fast development.


In this post I will try to simplify client application architecture (android client-server model) and provide list of famous frameworks. To solve solution of

  • Threads
  • Network operations
  • Cache/database
  • Re-usability 


Flow of application will be like below


So upon request or event trigger

  • First apply validations
  • Call service to execute request
  • Service with execute it can initiate thread to fetch data from server, or read from database(cache) or other facilitate other kind of requests
  • Service will return model, some data or exception
  • Services here are not android service. This layer helps you to reuse code in activities/fragments.

So what frameworks we can use in this architecture

   1.   View (Activity/Fragments)
           For view we have 
  • Robojuice  It help to bind xml view(gui), resources with objects. These annotation reduce line of code and enhance readability. 
  • Actionbarsherlock. Helps in managing navigation between view, standardization of actions for view, menu buttons on page for android 4.0+   
  • Droid4me helps you handling activity/fragment life cycle, exception handling , thread management, intra-component communication, file download management.
   2. Validations
  •  You can use my work utils jar.
  • Apache commons-validator, has xml validations and common validation methods (email addresses, dates, URLs, etc.)
   3. Thread
  •  For thread you can use Async tasks
  • You can use Robospice. It provides solution for threading, parsing data (xml, json), notification to view, exception handling.
  • You can use Droid4me for thread management.
   4.  Database manager
  • OrmLite use to create persist objects. So you dont need to populate objects after query and write code for operations like insertion, deletion, update etc your self.
  • Sqlitegen, use to create DAOs(data access object), easy to convert query results into object. 
  • ActiveAndroid allows you to save and retrieve SQLite database records without ever writing a single SQL statement. Each database record is wrapped neatly into a class with methods like save() and delete().
   5.  Network Manager 
  • Spring Restful helps communicating with servers over http, https protocols, methods can be post, get, put, delete. You can parse response direct into json, xml with the support of gson, jackson and other parsers for xml and json. (Recommended)
  • Use  Android-query to get json, xml, inputstream, files from server.

Sunday, April 14, 2013

Dependency injection android (roboguice review)

Pre-req: you should know about development in android.
I am using: For this tutorial I am using windows xp, maven, android 2.33 , spring restfull android, robojuice

Hi guys,


People those are familiar with spring and Inversion of control, They knows that IOC provides good level of abstraction in managing object(s) i.e initializations, object management, association management. And also decrease lines of code. So lets see roboguice.

To install this first create a maven base project.


1) Add dependencies for roboguice into the project (POM.XML).

 <dependency>
     <groupId>org.roboguice</groupId>
     <artifactId>roboguice</artifactId>
     <version>2.0</version>
  </dependency>
            <dependency>
               <groupId>com.google.code.findbugs</groupId>
               <artifactId>jsr305</artifactId>
              <version>1.3.9</version>
           </dependency>
Reference


2) What we have?
    We can megre 2 steps i.e declaration and initialization, we can avoid object creation and management on different  level (code liens) at class level.


We can create service and bind it with our activities/fragments. This provides alot of ease in fast development.

we can also bind android resources string/arrays/color/config etc to objects.

Reference

3) List of warped components 
   Robo juice warped many android components, list of these components are below

  • RoboActivity
  • RoboListActivity
  • RoboExpandableListActivity
  • RoboMapActivity
  • RoboPreferenceActivity
  • RoboAccountAuthenticatorActivity
  • RoboActivityGroup
  • RoboTabActivity
  • RoboFragmentActivity
  • RoboLauncherActivity
  • RoboService
  • RoboIntentService
  • RoboFragment
  • RoboListFragment
  • RoboDialogFragment

To use feature of robojuice, all you need is to extend your components with one of respective above warped components. for example if you want to use robojuice dependency management in your activity then extent your class with  RoboActivity  instead of Activity.

4) Create and activity
  Lets create a activity with robojuce, lets say we have  list of software houses.
 So I have a list of software houses in string.xml


 and my activity is like below:


5) Lets create a factory to execute web service calls (Powered by Spring rest for android)

i) Create an interface  ResponseFctory 


ii) Create implementation of ResponseFctory , 
       Add annotation @Singleton on the top of implementation, because we are creating a factory of singleton scope.


iii) Create configuration file to bind Interface with implementation
   A class extends AbstractModule and bind interface with implementation in configure function
with command

bind(ResponseFctory.class).to(ResponseFactoryImpl.class); 
below is example


iv) Register custom AbstractModule  with robojuice 
Create a robojuice.xml file in res/values folder. Add path of your Configuration class like below

<resources>
    <string-array name="roboguice_modules">
        <item>com.testguice.config.Configuration</item>
    </string-array>
</resources>


v) Use this factory inside your activity like below


6) Benefits

i) Decrease association. We can bind parameters with function. Hence increase decoupling.
ii) Promote polymorphism, Singeltons and interfaces. Hence increase decoupling.
iii) Object creation and management. you dont need to initialize objects on different level (lines in code) of class.. Hence increase readability
vi) Decrease lines of code. Enforce  best practices.

Source code available.

Sunday, April 7, 2013

Review Twitter Bootstrap

Using: For this tutorial I am using Netbean IDE , windows xp plateform, php as server side language.
Pre-req: You should know about html, java script and css.

Preview my work here

I was looking into twitter bootstrap so here is my findings.


A) Structure of application:
    All you need is download , extract and and put the folders into your application. It has js, css and img folders. you can use it with any server side language. For demonstration I am using php. So after putting the files my project lookes like below:


B) Structure of web page:
    For creating a web page, we have 2 options
    1) Use Table structure/layout to display your contents.
     2) Use Divs  to show contents , then you need to concentrate on css to set thes div on required positions,

  Twitter Bootstrap solves layout issues. They provide css of div to divid your pages into rows and columns. So we dont need to worry about  positions of the Divs to show our contents.

   <div class="row">
        <div class="span1">contents 1</div>
        <div class="span1">contents 2</div>
 </div>
Column span levels are from 1 to 12.


Responsive Bootstrap: They have css/style created for tabs, mobiles and desktop. So your structure can easily adjust for device and desktop. All you need is to include a meta tag and css file

  1. <meta name="viewport" content="width=device-width, initial-scale=1.0">
  2. <link href="assets/css/bootstrap-responsive.css" rel="stylesheet">

Their recommendation: Use on a limited basis and avoid creating entirely different versions of the same site. Instead, use them to complement each device's presentation. Responsive utilities should not be used with tables, and as such are not supported.   (Reference)

So I  made a sample page with rows and colums on desktopn this lookes like

On mobile phone it lookes like below:


C) Widgets
     We have list of wigets below. These can are adjustable on both devices and destops. So that means you can use intratcive and cool wedgits on your mobile applications.

  1.  Button groups 
  2.  Button dropdowns 
  3.  Navigational tabs, pills, and lists 
  4.  Navbar 
  5.  Labels 
  6.  Badges 
  7.  Page headers and hero unit 
  8.  Thumbnails 
  9.  Alerts 
  10.  Progress bars 
  11.  Modals 
  12.  Dropdowns 
  13.  Tooltips 
  14.  Popovers 
  15.  Accordion 
  16.  Carousel 
  17.  Typeahead 


So here is a view on desktop
and how the look on mobile device


D) Javascript
    Here we have

  1. Event handling (like we do in web app i.e clicks, selections, display, inrection etc
  2. Transitions 
  3. Custom popup called Modals 
  4. Tooltips
  5. Carousel


E) Style
     There are amazing style sheets available that workes for mobiles, tabs and destop. You can create beautiful headings, labels, buttons, meues , carosels, thumnails etc. It provides redability on mobile devices.

Reference

F) Customization

   We can easily customize our applications. And with it we can create application for both mobile and dektops. It will definitly decrease the development cost. Because I have noticed that web developer spent most of the time in adjectment of contents position on page and we put extra efforts to make our web pages compatible with mobile browsers. In twitter bootsrap javascript is very usefull, provides all kind of event handling that we need in a web application.


Sunday, March 31, 2013

Android Common Utilities

Hi guys,

In android projects there are many programs/commands we use frequently. Most of the time we implement these programs from scratch or take these program files from existing projects and refactor to adapt into new projects, This process take time. So I decide to put these programs together as much I can. So that developers can use them and reduce their development time. These days I am looking at every possibility to decrease the development time. This is one of my steps.

Pre-req: You should know how to create android project. Then download AndroidCommonUtils.jar jar and put into your project.

In this package we have these classes

    1. ActivityDTO
            Use Map (data structure) in this class, To pass data from activities to other components, Because I have seen under the development cycle, Most of the time we need to refactor functions and need to add or remove parameters, and some time functions took large number of parameters. So adding removing function parameters takes time. So this is my suggestion you can do following thing.
                ActivityDTO activityDTO = new ActivityDTO();
       activityDTO.getMap().put("activity", this);
       activityDTO.getMap().put("progressBarThread", progressBarThread);
       activityDTO.getMap().put("appDebuger",appDebuger);
       activityDTO.getMap().put("userConfigDb",userConfigDb);
     
LoginTask loginTask = new LoginTask(activityDTO);
loginTask.execute(userDTO);
Above example demonstrates how I am  sending different objects into  LoginTask constructor.And inside constructor I can get back these objects.

public LoginTask(ActivityDTO activityDTO) {
activity = (LoginActivity)activityDTO.getMap().get("activity");
progressBarThread =(ProgressThreadUtils)activityDTO.getMap().get("progressBarThread");
appDebuger = (AppDebuger)activityDTO.getMap().get("appDebuger");
userConfigDb = (UserConfigDb)activityDTO.getMap().get("userConfigDb");
}

     2.  AppDebuger
         This utility has methods to print logs on screen for purpose of debugung. I am using Singleton Pattern, Developer can on/off debuging from any where.
          AppDebuger appDebuger = AppDebuger.init();
          appDebuger.setOn(true);
          appDebuger.printInfo("Printhing from blog" , "1234");

    3. CommonMessagesUtils 
        This class has methods to show Toast messages and Dialog Messages.

    4. CommonValidationsUtils
        This class has methods to validate email, strings, password, convert stream into string, check strings are alpha numeric, decimal adjustment. ect

     5. DAOTemplate
           This class has method to insert, delete, remove, update, open close db connections almost every method that will help you to play with you database.
To use do like this
    
    6.  PrivateSharedPrefeqencesForStringsUtils
        This class has methods to save,remove and get presistant strings from android SharedPrefeqences.

    7.  ProgressThreadUtils
         This is a thread utility to manage progress dialog on you activities, State of thread is mentioned in ProgressThreadState enum. Inside your activity use this thread like this


    8.   SDCardUtils

        This class has all methods to save, retrieve files from sd card, you can download resources from internet into sd card and retrieve these as file or bitmap


Download source.


Friday, March 15, 2013

Use HTTPS connection in android app

Note : For this tutorial I am using Ubuntu platform 


1) If you are working on android application with client - server model. And services expose by servers are on SSL connection (i.e https://myserver/login?email=&password) then you need settings in your android applications.


1) Download the certificate. for demonstration I am using a link (i.e https://www.google.com) and chrome browser.
  a) Open chrome and this link : https://www.google.com
  b) Press Lock icon on you url bar and then select Connection tab
  c) Then select Certificate information
  d) You will see a pop up. Select details tab and Select top of Hierarchy under  Certificate Hierarchy section.
   e) press export button and save certificate in you directory.


f)  Certificate will be like :
-----BEGIN CERTIFICATE-----
MIIDIDCCAomg..........................................
-----END CERTIFICATE-----

2) Download  BouncyCastle Provider and put it will you SSL certificate file.
3) Open terminal and open your Oracle JDK bin folder
    cd /usr/lib/jvm/java-7-oracle/bin

4) use blow command to create a keystore file mykeystore.bks with

 password mysecret

keytool -importcert -v -trustcacerts -file "/path/Builtin Object Token:Equifax Secure CA" -alias IntermediateCA -keystore "/path/mykeystore.bks" -provider org.bouncycastle.jce.provider.BouncyCastleProvider -providerpath "/path/bcprov-jdk16-145.jar" -storetype BKS -storepass mysecret
5) To verify mykeystore.bks use below command on same terminal
keytool -list -keystore "/path/mykeystore.bks" -provider org.bouncycastle.jce.provider.BouncyCastleProvider -providerpath "/path/bcprov-jdk16-145.jar" -storetype BKS -storepass mysecret

you will get result like
Keystore type: BKS
Keystore provider: BC

Your keystore contains 1 entry

IntermediateCA, Mar 14, 2013, trustedCertEntry,
Certificate fingerprint (SHA1): D2:32:09:AD:23:D3:14:23:21:74:E4:0D:7F:9D:62:13:97:86:63:3A
 6) Now put mykeystore.bks in to your android project/res/raw/mykeystore.bks


7) Now use  mykeystore.bks into get response input stream from your request.
    you can get code here 

private static InputStream getHttpInputStream(String urlAddress,Context ctx)  throws KeyManagementException, NoSuchAlgorithmException, CertificateException, IOException, KeyStoreException, UnrecoverableKeyException{
        TrustManagerFactory tmf;
       
        KeyStore trustedStore = loadClientKeyStore(ctx);
        tmf = TrustManagerFactory.getInstance("X509");
        tmf.init(trustedStore);

        SSLContext ssl_context = SSLContext.getInstance("TLS");
        ssl_context.init(null, tmf.getTrustManagers(), null);
       
       
        HostnameVerifier hostnameVerifier = org.apache.http.conn.ssl.SSLSocketFactory.STRICT_HOSTNAME_VERIFIER;
       
        URL u = new URL(urlAddress);
        HttpsURLConnection urlConnection = (HttpsURLConnection) u.openConnection();
        urlConnection.setSSLSocketFactory(ssl_context.getSocketFactory());
        urlConnection.setHostnameVerifier(hostnameVerifier);
        urlConnection.connect();
       
        return (InputStream)urlConnection.getInputStream(); 
    }

    private static KeyStore loadClientKeyStore(Context context) throws KeyStoreException, NoSuchAlgorithmException, CertificateException, IOException {
            InputStream in =  context.getResources().openRawResource(R.raw.mykeystore);
            KeyStore trusted = null;
            trusted = KeyStore.getInstance("BKS");
            trusted.load(in, "mysecret".toCharArray());
            in.close();
            return trusted;
    }


Wednesday, March 13, 2013

Eclipse & maven setup for android development

I am using ubuntu. So developers of windows or mac should Google respective  softwares for their platforms.


1) Download latest an Eclipse.(I prefer Helios)
2) Download Android sdk.
3) Install ADT plugin in your eclipse follow this link.

4) Install maven using terminal
  • wget http://mirror.olnevhost.net/pub/apache/maven/binaries/apache-maven-3.0.4-bin.tar.gz
  • Run command above from the dir you want to extract maven to (e.g. /usr/local/apache-maven)
  • tar xvf apache-maven-3.0.4-bin.tar.gz
  • Export maven path:
    export M2_HOME=/usr/local/apache-maven/apache-maven-3.0.4
    export M2=$M2_HOME/bin
    export PATH=$M2:$PATH
  • Verify
    mvn -version
   
 5) Install M2e plugin (maven integration for eclipse)


 5.1) Go Window -> preferences > choose Maven from left menu -> Installations
       -> Add the path of installed folder form maven (you did in step 4)

5.2) Now in same menu select User settings and then browse path of maven you installed in step 4 and select cofig/settings.xml (i.e /usr/share/maven/conf/settings.xml)

6) Install Android configrator for m2e (From eclipse market place)
(Open help -> eclipse marketplace.. -> search for this plugin)


7) Select window -> Preferences -> Archetypes --> Add local catelog
   and add this  file  from your machine


Thats all you configuration for maven and eclipse of complete

Wednesday, January 30, 2013

How to speed up jquery for mobile and phoneGap

Pre-req: You guys can use Setup Blog post for setup. First of all create a android project and add  PhoneGap stuff into it. Then inside asset/www/css & asset/www/js
copy the jquery mobile js and css file.

In this tutorial i am giving tips to speed up you native app


1) Put you script code at the end of </body> tag.

2) Integrate the jquery function with phoneGap function for example in my code app is consuming JSON from a PHP server. I used
document.addEventListener("deviceready", onDeviceReady, false);
function onDeviceReady() {
        $.getJSON("http://aamirkhan9876.byethost7.com/mobMoviesServer/services/m/get_banners.php",function(jData){//code});
}
onDeviceReady(); is provided by phoneGap.

3) PhoneGap application takes time on startup. A black screen appears for few seconds. To avoide that use a splash screen.


  On DroidGap Activity. use
        super.setIntegerProperty("splashscreen", R.drawable.images);
        super.loadUrl("file:///android_asset/www/index.html", 10000);  
 It will show the splash screen instead of black screen for 10000 ms.
 For activity loads before this time use blow code in index.html
 function onDeviceReady() {
      cordova.exec(null, null, "SplashScreen", "hide", []);
}

 4) Avoid jquery mobile nvigation transition. If you can.
     $.mobile.defaultPageTransition="none"
5) Compress your js & css files. Use any Compressor. i.e I found yui compressor awesome.

Source code is available.


Sunday, January 27, 2013

Facebook Connect & Jquery For mobile, Phonegap android app


If you want to create an android native app rather the a web app then you need Facebook android sdk for connect purpose. If you want to use html 5, jquery and other stuff and want to create a native app from these
scripting languages. Then one of the good solution is phone gap. Below example demonstrate how to create a phone gap project.

For setup download few things:

1) PhoneGap sdk
2) Facebook android sdk, For your help here is a jar file with all class files sdk have.
3) Phonegap plugin facebook connect


Step A:
          i) Extract facebook android sdk and copy \facebook-android-sdk-3.0.2.b\facebook to your destination folder.
ii) Open eclipse and go to File -> Import -> Existing Project into work space.
iii) Then go to your dest. work space and select the facebook project.
iv) Modify AndroidManifest according to your requirements and add permission for internet access.
v) facebook is name of my project.

Step B:

i) Extract PhoneGap sdk. Go to folder phonegap-2.3.0\lib\android.
ii) Copy folder xml and past it into facebook/res
Add below lines in xml

<plugin name="org.apache.cordova.facebook.Connect" value="org.apache.cordova.facebook.ConnectPlugin" />

iii) Copy cordova-2.3.0.jar into folder facebook/libs. Right click the jar and select Build Path -> Add to Build Path.
iv) Copy cordova-2.3.0.js into  \facebook\assets\www. IF you dont find these folders the create.
vii) Create a droid activity as we do in PhoneGap. Let say MainActivity.java

Step C:
By Project here I mean facebook the destination project.

i) Extract Phone facebook connect plugin.
ii) Copy www/cdv-plugin-fb-connect.js into project assets\www.
iii) Copy lib/facebook_js_sdk into project assets\www.
iv) Copy org\apache\cordova\facebook\ConnectPlugin.java to project src folder.
v) Copy contents fron folder phonegap-plugin-facebook-connect-master\example\HackBook  to project assets\www.
vi) Edit index.html and put your facebook app id there. Click for Tutorial 


Note: Right Click project Go to Properties -> Android and un check Is Library option. 

You can use Jquery for mobile in this project , put jquery for mobiles css and js files into www/css,
www/js folders.
You index.html will look like this. 

Now you can run project on device.

For Source code click.


Click here for Referece.